How to Make Vertical Pic in Powerpoint Mac 2011
vi Easy Steps to Create a "Stand Out" Slide and Beat out the Background Noise
UPDATE: The highlight motion picture issue explained in this article was created in PowerPoint 2013. Users of PowerPoint 2010 have to customize their PowerPoint Ribbon to use this hack. Please see the steps given at the cease of this article to create this consequence in PowerPoint 2010.
At that place are many times when you need to highlight a particular area of the slide and fade out everything else in the background. It improves the aesthetics of the slide, definitely, but more importantly, you need this effect for i major reason:
To remove the background noise and focus on the portion that is the crux of the slide.
You don't need to learn Photoshop or CorelDraw to reach this absurd 'Highlight Picture Event' . Information technology can exist easily done using the good old PowerPoint! This article volition walk you through 6 steps to create such a slide wherein the thespian or the almost meaning object in a slide stands out and grabs the immediate attending of the audition.
Let's get started. Say you take a slide well-nigh the qualities of a team leader. You have 6 or ten qualities that can be listed out on a slide in the onetime fashioned mode similar the one below:

At present, how about presenting the same using a visual of a squad with spotlight on the leader! Hither'due south what the transformation would look similar:

The after slide not only looks better but is as well easier to read and encompass. The visual and the words complement each other to create the correct impression.
This design is only 6 steps abroad. Open your PowerPoint presentation, move to the slide where you want to give such an upshot, and work with u.s. step by step to pull it off. Here we go:
Steps To Create Highlight Pic Event
Step 1- Add an Image
There should be no trouble in finding a good, high-resolution business squad stock photo from the internet. Just cover the entire slide canvas with that visual.

Step 2- Insert a Circle and Merge the two Shapes
Draw a circumvolve around the surface area you wish to highlight, the team leader in this case. Here are the steps to insert and draw a circle:
- Click the Insert tab
- From the Shapes card, select the Oval shape
- Press Shift and drag to draw a perfectly proportionate circle.
Equally y'all drag to describe the circle, you are able to clearly meet if the surface area you require has been properly covered or not.

Fragment the Prototype and the Shape- We volition now merge the prototype and the circle to cut the portion that we desire to highlight. Here'due south how you lot practice it in PowerPoint:
- Kickoff, select the paradigm showing on your slide
- Press Ctrl and select the circle as well
- Become to the Format tab nether Cartoon Tools
- Under the Merge Shapes carte du jour, click Fragment

You might assume nothing happened at all. But the leader's confront has at present been fragmented as you lot can run across in the selected portion below:

Footstep iii- Blur the Prototype
We will now blur the rest of the squad members and so that simply the leader stands out bright and articulate. Follow these steps:
- Select the total size image, not the fragmented one
- Go to the Artistic Effects menu nether the Format tab and select the Blur option

Now, only the fragmented paradigm remains highlighted. Since the difference isn't that stark to create an awesome effect, nosotros'll demand to apply the fourth step likewise.
Step four- Add together a Transparent Shape
Adding a transparent shape serves a twofold purpose: it volition make the fragmented circular epitome of the team leader stand up out. Second, it volition allow us to display our content that can be read with ease. To add such a shape, follow these steps:
- From the Shapes carte under the Insert tab, choose the Rectangle option
- Cover the complete slide with the rectangle
- Right click on the shape and click Format Shape
- The Format Shape box will open on the right
- Select the No line radio button under the Line card
- Change the Solid fill to blackness and prepare the transparency at 25%

We now need to send this transparent shape astern and the fragmented image forrard. To do that:
- Select the transparent shape
- Go to the Selection Pane nether the Format tab (see screenshot beneath)

- Locate the fragmented image from the panel on the right
- Click the Bring Forrard control (in the Format tab). Keep clicking till you lot meet the highlighted face up on the meridian.

The highlighted circle will now pop out lending an awesome effect to the slide:

Step five: Give the Highlighted Portion an Outline
This step is very elementary. Insert a circle from the Shapes menu once more, this time larger than the highlighted portion. From the Format Shape bill of fare, remove the fill color from the circumvolve and change the outline to Gold or Xanthous. You tin can increment the width of the line to brand it more visible (for our slide we kept the width at 3 points). See the screenshot below:

To ensure that the gap between the outline and the image is evenly distributed, select the two objects, go to the Format tab, locate the Marshal menu and click Align Centre and and then the Align Middle selection. You'll get a perfectly aligned outline with these steps.

Step 6- Add Pointers to List Out Content
We come to the last step- add our content in the virtually effective manner. For that, nosotros'll create pointers that bear upon the circular outline and distribute them equally on both sides of the shape.This is what me mean by calculation pointers to the edges of the outline:

And this is how these pretty pointers can exist created in PowerPoint:

The tricky part is to distribute them evenly both horizontally and vertically. You lot can rotate them to give a slant by dragging the edges of the line. If you lot are facing trouble doing that, you lot tin can simply go on those pointers directly and accept 4 on the left and four on the right side.
Last but not the least, put each bullet points next to a pointer. Make your heading bold and big, you can fifty-fifty give the text box a solid fill for added affect. Only select the text box, right click on the shape, click Format Shape and give information technology a Solid Fill colour of your choice. That'southward it, your super awesome slide is ready to amaze:

Where Tin You Employ The Highlight Picture Design Layout:
Y'all tin apply this highlight picture effect on any presentation slide where you need to put spotlight on ane portion of the image and dim out the rest.
- Introduce your team
- Listing out product features
- Highlight key services offered by your business organisation
- Explain potential solutions/benefits of your products
- Flaunt business organisation milestones
- Bespeak out your corporate goals, company mission, and vision, targets for the new fiscal twelvemonth, etc.
Taking an example, you lot can highlight the features of Apple iWatch using this stand-out effect:

How to Create Highlight Film Effect in PowerPoint 2010:
The 'Merge Shapes' feature in 2013 version is hidden in PowerPoint 2010 and is chosen 'Combine Shapes'. Please follow these steps to integrate the functionality in your Ribbon:
ane. Click the File tab (farthermost left corner in the PowerPoint Ribbon)
2. Click Options
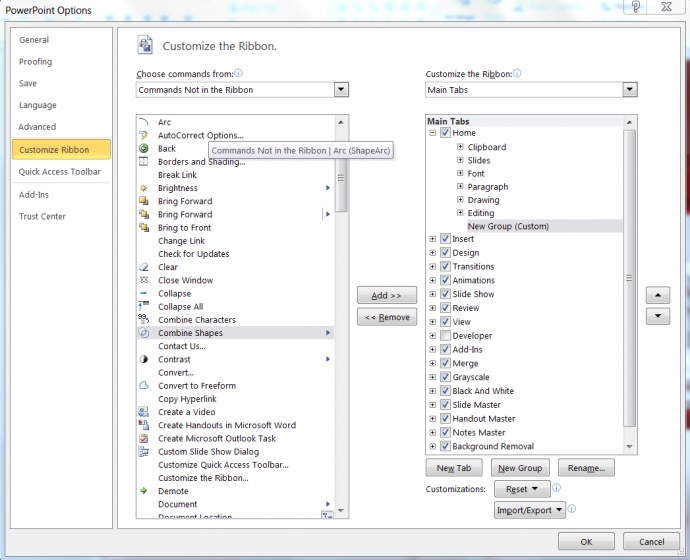
3. Select the "Customize Ribbon" option
iv. Under the "Choose commands from" drop-downwards menu, select "Commands Not in the Ribbon"
5. Now, locate the "Combine Shapes" command from the list
6. Create a New Grouping within an existing tab or create a New Tab using the dialog box on right.
seven. Add 'Combine Shapes' to the new tab or group you have created
8. Click Ok to salvage the changes you take washed.
The 'Combine Shapes' characteristic will now be permanently integrated within your Ribbon. Yous'll even so still face one problem- the combined shapes options will exist grayed out when you select the image and the shape. PowerPoint 2010 allows you to utilize this effect on shapes simply. But there is a workaround. We will convert the prototype into shape! Here'south how:
You'll take to insert the total visual once again in PowerPoint 2010 and ship it backward. The rest of the steps will remain the same as explained in the article above.
How did you like the highlight moving-picture show PowerPoint tutorial? Delight share your feedback in the comments beneath.
Share this knowledge with your friends and followers; hither'southward a pre-populated tweet to arrive easier for you lot.
If y'all are facing trouble anywhere in your PowerPoint presentation and demand a professional touch, you tin can go far touch on with our proficient PowerPoint Presentation Design Services Squad. Get a single slide or the unabridged deck designed or redesigned for a flawless wait and feel.
DOWNLOAD HERE
How to Make Vertical Pic in Powerpoint Mac 2011 TUTORIAL
Posted by: lewishungloned.blogspot.com


Comments
Post a Comment